AA Patch Tool
Ace Attorney Patch Tool (AA Patch Tool for short) is a tool that allows to apply all sorts of modifications over various Ace Attorney games released for the Nintendo 3DS console and devices powered by Android OS. AA Patch Tool also makes it possible to change (re-assign) the in-game music in Phoenix Wright: Ace Attorney Trilogy (3DS) and Apollo Justice: Ace Attorney (3DS) and add completely new tracks through mods, as well as sign apk files from any application with a debug key.
It is highly advised to read this manual before attempting any changes.
Note: AA Patch Tool may contain bugs. The author of this tool is not liable for any damage to your computer equipment and/or loss of any files on your storage medium.
Nintendo 3DS
General information
The partition containing AA Patch Tool must have at least 5GB of free HDD space.
Patching is supported for the following games:
- Gyakuten Saiban 123: Naruhodo Selection/Phoenix Wright: Ace Attorney Trilogy
- Gyakuten Saiban 4/Apollo Justice: Ace Attorney
- Gyakuten Saiban 5/Phoenix Wright: Ace Attorney — Dual Destinies
- Gyakuten Saiban 6/Phoenix Wright: Ace Attorney — Spirit of Justice
- Layton Kyouju vs Gyakuten Saiban/Professor Layton vs. Phoenix Wright
Music insertion and replacement is supported for the following games:
- Gyakuten Saiban 123: Naruhodo Selection/Phoenix Wright: Ace Attorney Trilogy
- Gyakuten Saiban 4/Apollo Justice: Ace Attorney
In order to install patches you will need a decrypted ROM of the game. If the input ROM is decrypted, a message denoting game title and region will appear in the console, otherwise you will get an error message. A tutorial on how to decrypt a ROM could be found below.
In order to run modified ROMs you will need a Nintendo 3DS with a custom firmware (CFW). Sky3DS should theoretically work, but it has not been tested. Modified ROMs also work with the Citra emulator.
Make a ROM backup before applying any patches in case anything goes wrong.
Patch information
The program comes with two patches that allow you to change the voice over (undub) in Ace Attorney Trilogy and Apollo Justice. Other patches can be found here.
After downloading a patch archive, unpack it to any place you like, and then copy its content (folder) to <AAPatchTool.exe>/patches/3DS.
Some patches are region specific (particularly, translation patches), while others, like music mods, will work with every regional version.
The following designations are used to denote patches:
- [T-XXX] (where XXX is a language ID) — translation patch.
- [Music] — music modification.
- [VO] — voice over.
- [Graphics] — graphics modification.
Supported ROM formats
AA Patch Tool accepts the following ROM formats as input:
- .3ds — Sky3DS flash-carts, Citra.
- .cia — Custom Firmware (CFW), some Citra builds; Citra.
- .cxi — a pure ROM that contains only the game, Citra.
The following formats are supported for output:
- .3ds — only if the input ROM is .3ds.
- .cia — available for all input formats.
- .cxi — available for all input formats.
AA Patch Tool has only partial support for .3ds format. Its proper functionality is not guaranteed.
Nintendo 3DS ROM decryption
All credits go to b2071988 from romshepherd.com. Supported ROM formats: .3ds, .cia.
| 1. | Download the following archive, and unpack it anywhere you want. |
| 2. | Copy the encrypted ROM to the folder "decrypt_v2". |
| 3. | To start the decryption process, drag&Drop the encrypted ROM onto "decrypt.exe".
After the process is done, at least two new files will appear in the same folder: rom_name.0.ncch — a CXI ROM that contains only the game. rom_name.1.ncch — user manual. |
| 4. | Change the "rom_name.0.ncch" file extension from .ncch to .cxi, otherwise it will not appear in AA Patch Tool. |
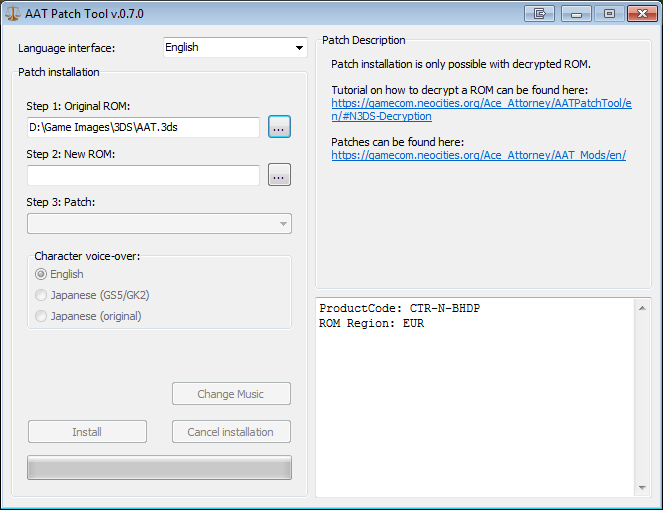
Patch installation
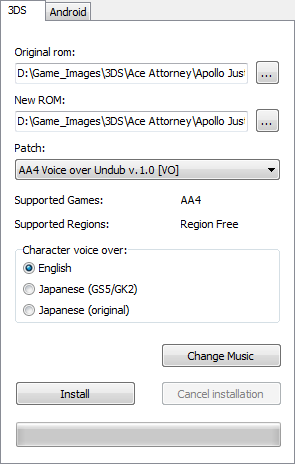
| 1. | Original ROM: the path to the unmodified ROM. If the input ROM is encrypted, an appropriate message will appear in the console on the right. If the old ROM is decrypted, its title and region will appear in the console. |
| 2. | New ROM: the path to the new ROM. The output ROM format is set through the "File Format" dropdown list at the bottom of the "Save as" dialog. |
| 3. | Patch: the list of available mods. After selecting a patch its description will appear in "Patch Description" on the right. If the patch has a voice over, the "Character voice over" box will become enabled. Note: the patch list contains mods that match the original ROM region. For example, if you have a EUR ROM, the list will only contain the EUR and region free patches. |
| 4. | Character voice over: the available voice over to choose from. This box is enabled only if the patch has the necessary files, otherwise it is disabled. |
| 5. | Change Music (optional): a detailed description on how to use this feature is found in the "How to change default music" section. |
| 6. | To start installation press the "Install" button.
The installation process will be displayed in the console. It will take some time,
depending on your storage medium performance. If an error occurs, you will see a
message in the console. If the installation is successful,
the following message will appear in the console:Patch has been installed. ROM saved to [*new ROM path*].
|
General information about music mods
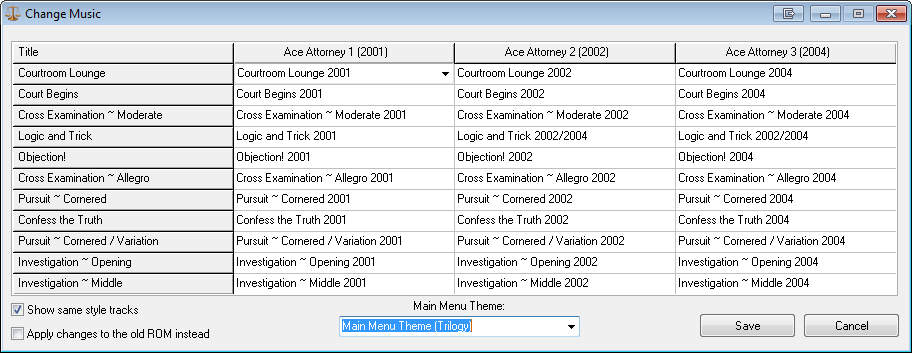
AA Patch Tool allows you to change the in-game music and to add new tracks through mods.
If the input ROM is decrypted and output ROM is specified, the "Change Music" button becomes active. Upon pressing it you will see a new window with all the chosen tracks listed in a table. Columns denote games, rows - tracks. Each track contains a year in its title. It corresponds with the year that is specified in the title of each game and to the official Gyakuten Saiban OSTs (since OSTs were never released outside Japan, the English titles are unofficial).
In order to change the track, highlight it with the mouse. An arrow will appear at the right side of the box. By pressing it you will reveal a drop down list containing all the available tracks.
Note: Ace Attorney 2 and Ace Attorney 3 share the same track for "Logic and Trick".
The menu contains two options:
Show same style tracks: if this box is checked, the drop down list will contain only the tracks corresponding to the row title at the left. If it is unchecked the drop down list will contain all available tracks. This option does not affect the drop down list in "Main Menu Theme"
Apply changes to the original ROM instead: If this box is checked, upon pressing the 'Save' button, any changes made to the current track list will be written directly to the original ROM. In this case, there is no need to press the "Install" button. Warning: If you are about to install the patch that adds new music, do not tick this box, otherwise the new ROM will not work.
Note: in Apollo Justice direct replacement for tracks in the "7 Years Ago" column is only partially supported. If after direct replacement some tracks do not play in the game, do a full installation instead.
How to change default music
Note: music could be changed even if the <AAPatchTool.exe>/patches/3DS folder does not contain any patches.
| 1. | Specify the path to the original ROM. |
| 2. | Specify the path to the new ROM. |
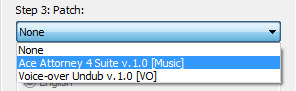
| 3. | In "Step 3" choose "None" or any patch that does not add new music tracks. |
| 4. | Press "Change Music" and change the music as you like. You can tick the "Apply changes to the original ROM instead" box - after pressing "Save" all the track list changes will be applied to the original ROM. If you want to leave the original ROM untouched, do not tick it and proceed to the next step. |
| 5. | After everything is done press "Save", then "Install" and wait until the installation is finished. |
Music mods installation
Warning: music mods add new files to the ROM and increase its size. It is not possible to delete them with AA Patch Tool, so always make a backup before applying any patches.
Note: Music mods are denoted as [Music].
| 1. | Specify the path to the original ROM. |
| 2. | Specify the path to the new ROM. |
 |
|
| 3. | In "Step 3" choose any music mod. I'll use the "Ace Attorney 4 Suite v.1.0 [Music]" mod as an example. The new tracks to be added are listed in the patch description. |
 |
|
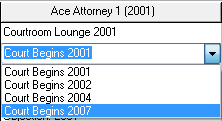
| 4. | Press "Change Music" and change the music as you want.
In this example new tracks will look like this - [new track title] 2007
(Courtroom Lounge 2007, Court Begins 2007, etc). Warning: if the patch is installed for the first time do not tick the "Apply changes to the original ROM instead" box, otherwise the new ROM will not work. |
| 5. | After everything is done press "Save", then "Install" and wait until the installation is finished. |
Changing music after music mod installation
Let's assume the ROM has already been patched with the "Ace Attorney 4 Suite v.1.0 [Music]" mod from the previous section, and we want to change its track list.
| 1. | Specify the path to the ROM that has been created in the previous section. |
| 2. | Specify the path to the new ROM. |
| 3. | In "Step 3" choose the "Ace Attorney 4 Suite v.1.0 [Music]" mod. If you choose some other patch, the new tracks will not be properly displayed in the "Change Music" menu. They will have BGMXXX as their title (where XXX is a number). |
| 4. | Press "Change Music". The track list will show all the changes that you made. Once again change the music as you want. This time it is OK to check the "Apply changes to the original ROM instead" box, since the original ROM already has the new tracks from this patch. |
| 5. | After everything is done press "Save". You don't have to press "Install" if the "Apply changes to the original ROM instead" box was checked. Otherwise, press it and wait until the installation is finished. |
Installing additional music mods
You can install several music mods onto the same ROM. In this case, the installation steps are the same as in the "Music mods installation" section. The only difference is that the tracks that were added by other patches will not be properly displayed in the "Change Music" menu. They will have BGMXXX as their title (where XXX is a number). They will work as long as you do not change them.
How to create custom mods
This tutorial describes how to make a custom mod for Ace Attorney Trilogy, Apollo Justice, Dual Destinies, Spirit of Justice and Professor Layton vs. Phoenix Wright.
| 1. | Create a folder in <AAPatchTool.exe>/patches/3DS and give it some meaningful name, for example Ace Attorney 4 New Font [Graphics]. | ||||||||||||||
| 2. | Copy English.dsc file from <AAPatchTool.exe>/template/ into your patch folder. Open it in any text editor.
|
||||||||||||||
| 3. | If you have modified files in the game's exefs folder, create a folder called exefs inside your patch folder and copy all the files that you modified over there. | ||||||||||||||
| 4. |
If you have modified files in the romfs folder, create a folder called romfs inside your patch folder and copy all the files that you modified over there, but make sure to keep intact the game's file and folder structure. Let's say the romfs folder contains another folder called UI, which has files 1.example, 2.example, 3.example. Let's say you have modified the file 2.example. Create a folder UI inside <your patch folder>/ |
||||||||||||||
| 5. | If you are making a mod for Ace Attorney Trilogy or Apollo Justice, you have probably noticed that those games keep all their resources inside one huge pack.dat archive. There are two ways to modify it.
The first way is by creating an xdelta file.
Xdelta is a difference patch - that is, it stores only the difference between the original and
modified files. This patching method is faster to install and easier to create, but it makes
it impossible to have several independent patches that modify pack.dat.
The second way is to unpack the pack.dat, replace all the modified files and repack it back. It will take longer to install, but you can have several mods that modify pack.dat. independently from each other. Which method to choose is up to you. Xdelta method:
|
||||||||||||||
| 6. | Your mod/patch is ready for deployment. |
How to create custom music mods
This tutorial describes how to make a custom music mod for Ace Attorney Trilogy and Apollo Justice.
In order to create your own music mod you will need a tool called BrawlCrate and any audio editor of your liking. In this guide I will use Audacity which comes completely free of charge. Before we start you need to understand how looped music is stored in the game.
A looped track is a single continuous stream that contains two offsets - Loop Start and Loop End. The game starts playing the track from the start of the file, and when it reaches the Loop End offset it seamlessly jumps to the Loop Start offset, in essence making the playback infinite. Since the game always exits loops by fading the playback out, the looped tracks do not contain an outro - a segment that usually follows the loop segment. Thus the Loop End offset always points to the end of the file.
AA Patch Tool allows to replace only a limited number of themes - the main court suite and two investigation tracks. However you can add as many tracks as you want for any given theme. In other words, your patch may contain as many Objection, Pursuit, etc tracks to choose from as you want. Also, you do not necessary have to add music for every theme - you may add replacements for just one or several themes.
| 1. | Open your audio editor and load the audio file you want to convert for use in the game. | ||||||
| 2. | Switch the timecode/timeline of your editor into the "Sample" mode. In Audacity those options are found at the bottom of the editor's window: | ||||||
 |
|||||||
| 3. | Now comes the trickiest part: you have to find (or make) the loop
segment. If you are using tracks from other games in the series, it wouldn't be hard, since
they already have loops - you just have to find where they start and end. But if you are
working with something like orchestrated music, you would have to go the extra mile to create
a loop. In conclusion, you will need to find such a segment, which, when looped, will play back
seamlessly without any noticeable gaps or distortions.
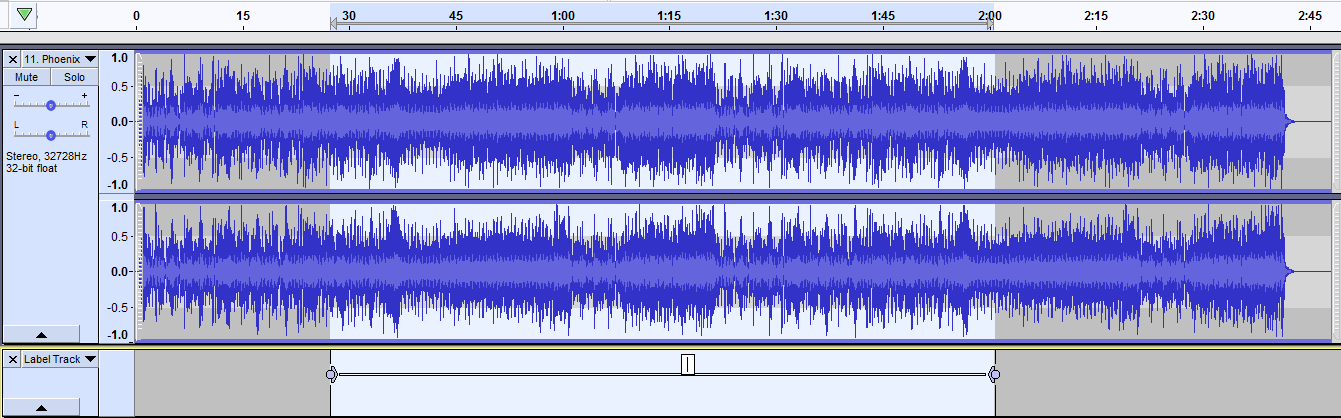
First start by playing the audio several times. Try to detected by ear which part of the track contains a repeating pattern. Then make a ballpark selection by holding the left mouse button. Press Ctrl+B to create a Label Track (it will appear below your main music track). The label selection has knobs - dragging them will change its boundaries (you have to place the cursor at "arrows" rather then "points" to be able to move the boundaries around). To reselect the selection again press Alt+Left/Right. To playback the selection in loop mode press Shift+Space. To take a closer look at the audio wave press Ctrl+1 to zoom in and Ctrl+3 to zoom out. At the end of this this step you need to have a selection that produces a perfect loop segment: |
||||||
 |
|||||||
| 4. | Most likely your loop segment will contain extra audio on its right side. Since the game never uses it, we can safely delete it. To remove it, place the cursor at the right bound of your loop - a vertical yellow line should appear (it means you are over the loop boundary). Click on it with the left mouse button and then press Ctrl+I - the track will be split into two parts. Double click on the right part and press the Delete button on the keyboard. | ||||||
| 5. | (This step is optional, but if you do not hear any audio after installing your patch, try it out.) Reduce the frequency of your track to 32728hz. Go to Tracks - Resample and input 32728. | ||||||
| 6. | Save your audio as WAV file (File - Export - Export as WAV), but do not close the audio editor yet. | ||||||
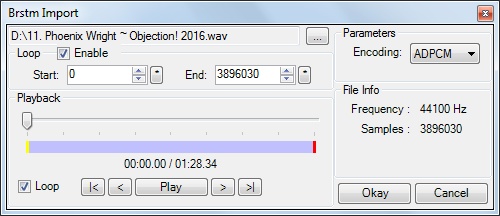
| 7. | Launch BrawlCrate and go to File - New - BRSTM Audio Stream, then select the WAV file you have created in the previous step - a Brstm Import window will appear: | ||||||
 |
|||||||
| 8. | If you have removed the extra audio part, you will only need to set the Loop Start offset - the Loop End offset will be automatically set up by the tool. Reopen Audacity and click on the start of your loop (its leftmost boundary). The Audio Position at the bottom will indicate the current sample position - input this value into the Loop Start field and then press Enter. To confirm your loop works as intended, tick the Loop checkbox and playback your track. If you are satisfied with the results, move to the next step, otherwise readjust your loop settings in the audio editor or Brstm Import window. | ||||||
| 9. | In the Brstm Import window press the OK button, wait for the encoding process to finish, then go to File - Save as and save the file as bcstm audio. | ||||||
| 10. | If you have other tracks you want to insert into the game, convert them the same way you did the first one. When you have all the files you want to add in bcstm format, proceed to the next step. | ||||||
| 11. | Create a folder on your hard drive - it will contain your future patch. Give it some meaningful name, for example Ace Attorney 6 Suite [Music]. Make sure to put [Music] at the end of the name. | ||||||
| 12. | Inside your new patch folder create a folder called romfs. Inside the romfs folder create a folder called sound. Inside the sound folder create a folder called stream. Eventually you should end up with the following folder structure: <your patch folder>/ |
||||||
| 13. | Copy English.dsc from <AAPatchTool.exe>/template/ into your patch folder.
Open it in any text editor.
|
||||||
| 14. | Depending on which game your patch is meant for, copy either TracklistAAT.tls or TracklistAA4.tls from <AAPatchTool.exe>/template/ into your patch folder. You may also copy both files if you want your patch to be available for both AAT and AA4. Open the file(s) in any text editor. | ||||||
| 15. | At the top of TracklistXXX.tls there is the following line (xx is some number, depending on the file):
TrackCount:xx
Change its value by adding the total number of your bcstm files to it. For example, if you have 8 bcstm files in total and TrackCount is 35, add 8 to 35 to get:
TrackCount:43
|
||||||
| 16. | Now you have to specify every track that you will include into
your patch. As you can see all the tracks are grouped by themes (a small snippet of what you
will see in TracklistAAT.tls):
BGM008:"Courtroom Lounge 2001":1
Each track is comprised of three fields: the first one is BGM index, the second one is Track Name - it will be shown in the Change Music editor of AA Patch Tool, and the third one is Group Index which allows AA Patch Tool to group tracks according to themes (if you have ticked the appropriate checkbox in the Change Music editor). Let's say you want to add a new "Courtroom Lounge" theme. To do this, copy one of the existing "Courtroom Lounge" lines and add it at the bottom of the group, then rename it however you see fit (make sure the quotes are present on either side):
BGM008:"Courtroom Lounge 2001":1
Now you have to give your track a unique BGM index. There are two ranges which you can use. The first starts from BGM157 and ends at BGM199. The second range starts at BGM201 and most likely ends at BGM999 or even higher (BGM200 is used by the "Main Menu" theme). Those indices are what makes it possible to have several music patches installed into the same ROM. As of now there are three music patches available at this site. They use the BGM157 - BGM192 range. If you want to make your patch compatible with those patches, or if you plan to make your patch publicly available, use ranges BGM201 - BGM999, otherwise index your tracks starting from BGM157 (but do not use BGM200). In the end it doesn't matter what range you use - the most important thing is that each track you add must have a unique index. An example of what you might have if you add three new tracks:
BGM008:"Courtroom Lounge 2001":1
|
||||||
| 17. | After this you need to rename all your bcstm files according to their BGM index you set in TracklistXXX.tls. In the example above "Khura'in Courtroom Lounge 2016" was given index BGM201, so its track file should be named BGM201.dspadpcm.bcstm, "Court Begins 2016" should be named BGM202.dspadpcm.bcstm and "Court Begins Abroad 2016" - BGM203.dspadpcm.bcstm. | ||||||
| 18. | Move all your renamed bcstm files into
<your patch folder>/ | ||||||
| 19. | If you are going to make you patch public, create a readme.txt file, fill it with some description and put it into your patch folder. | ||||||
| 20. | Move your patch folder into <AA Patch Tool folder> |
Android
General information
The partition containing AA Patch Tool must have at least 5GB of free HDD space.
Patching is supported for the following games:
- Gyakuten Saiban 123: Naruhodo Selection/Phoenix Wright: Ace Attorney Trilogy
- Gyakuten Saiban 4/Apollo Justice: Ace Attorney
- Gyakuten Kenji/Ace Attorney Investigations: Miles Edgeworth
- Gyakuten Kenji 2
Apk files contain proper game version number, while asset files lack it. When opened in the tool, rather then showing a single version number, asset files display the range of game versions they are compatible with.
After installing a patch over the apk file it will be signed by a debug key; without one it will be impossible to install the game. Signing with a debug key affects neither the user's Google account, nor the game's functioning.
There are two types of obb asset files: main.obb and patch.obb. If the patch.obb file is in the same folder as the main.obb file, and has the same name, the files inside patch.obb will replace the similarly named files inside main.obb. However this feature is not available for all games.
Patch information
The program comes with two patches for Apollo Justice that allow you to change the voice over (undub) and remove screen borders. Other patches can be found here.
After downloading a patch archive, unpack it to any place you like, and then copy its content (folder) to <AAPatchTool.exe>/patches/Android.
Patches may target any version of a game, with any language, or just a single version with a particular language. The detailed information about compatibility is specified in the description of each patch.
A patch may be installed over a single or multiple files. For instance, a patch that replaces the contents of apk and asset files may be installed either over apk or asset file, or both at the same time. However, this is not the case with AA4 version 1.00.02 and lower, AAI version 1.00.00 and 1.00.01 and GK2 version 1.00.00: since the apk file of those versions contains an obb hash that needs to be recalculated each time the asset file is updated (the game will not work without it), patching an asset file without specifying the apk file for these version is not possible.
It is possible to install a patch over previously patched files, assuming the total amount of files in the installed patch is greater than or equal to that of the previous patch.
Patch archives may contain a file called patch.obb, which already contains the modified files. To apply it, simply copy the patch.obb file to the same folder containing the main.obb file. However, to use several different patches at the same time, you have to install each one of them using AA Patch Tool — either by patching the main.obb file or patch.obb file.
The list of available patches is formed based on the user selected files, version of the game and patch specifications. For instance, if the user specifies only an apk file, the patch list will contain only those patches that are compatible with the selected game and include an apk folder with the new files. Respectively, if the user specifies both apk and asset files, the patch list will contain patches that include either an apk folder, obb folder — or both.
If both apk and asset files are specified but the patch folder contains just one apk/obb folder, the patch will be installed only over the file which has the corresponding folder.
The following designations are used to denote patches:
- [T-XXX] (where XXX is a language ID) — translation patch.
- [Music] — music modification.
- [VO] — voice over.
- [Graphics] — graphics modification.
Supported file formats
AA Patch Tool accepts the following file formats as input:
- .apk — zip archive with installation or asset files.
- .obb — zip archive with asset files (main.obb or patch.obb).
Patch installation
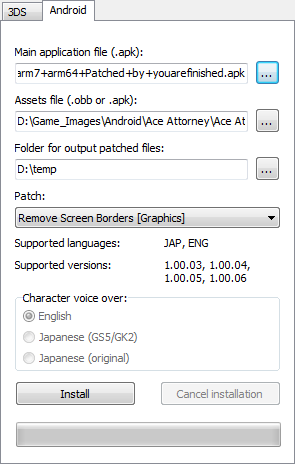
| 1. | Main application file (.apk): the path to the main apk file. If the input file is supported, its title and version will appear in the console, with the patch drop down list becoming active. |
| 2. | Assets file (.obb or .apk): the path to the obb (AA4/AAI/GK2) or apk (AAT) file containing the game assets. If the input file is supported, its title and apk versions it is compatible with will appear in the console, with the patch drop down list becoming active. |
| 3. | Folder for output patched files: the path to the folder for storing the processed file(s). If this field is left empty, the patch will be installed directly over the files specified in the previous steps. As a safety measure, a warning prompt will appear before attempting installation. |
| 4. | Patch: the list of available mods. After selecting a patch its description will appear in "Patch Description" on the right. If the patch has a voice over, the "Character voice over" box will become enabled. The list contains only those patches that can be installed over the user specified files. Refer to the "Patch information" section for more information. |
| 5. | Character voice over: available voice over to choose from. This box is enabled only if the patch has the necessary files, otherwise it is disabled. |
| 6. | To start installation press the "Install" button.
The installation process will be displayed in the console. It will take some time,
depending on your storage medium performance. If an error occurs, you will see a
message in the console. If the installation is successful,
the following message will appear in the console: Patch has been installed.
|
Apk file sign
AA Patch Tool can also sign apk files from any application with a debug key without the need to install any patches.
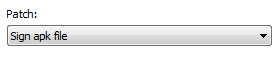
To sign an apk file specify it in the "Main application file (.apk)" field, then select "Sign apk file" in the patch list and press the "Install" button.
How to translate AA Patch Tool
The language files used to form the UI are stored in the lang folder. Make a copy of English.lng and rename it to your language, for example, Deutsch.lng (you are free to use language specific symbols when naming .lng files). Then open the new file in any text editor and translate all the strings.
Switching languages is done through the "Language interface" drop down list.
Credits
AA Patch Tool created and coded by Dant
Uses TntWare Delphi Unicode Controls library.
Copyright (c) 2002-2007, Troy Wolbrink (www.tntware.com)
Third party tools:
- CtrTool — Neimod & 3DSGuy
- Makerom — 3DSGuy
- 3dstool — dnasdw & QuChao
- xdelta — jmacd
- signapk — dvdforge
Version History
AA Patch Tool v.2.1.0
- Added support for the Android version of Ghost Trick.
- Fixed the "Language files are missing" error that occurred when launching the app from the user's folder containing non-ASCII chars.
- Updated signapk tool with a newer version that properly handles huge apks.
- Added separate .dsc templates for 3DS and Android patches in the template folder.
AA Patch Tool v.2.0.0
- Added patch support for some games in the Ace Attorney series released for Android OS.
The following games are supported:
Gyakuten Saiban 123/Ace Attorney Trilogy;
Gyakuten Saiban 4/Apollo Justice: Ace Attorney;
Gyakuten Kenji/Ace Attorney Investigations;
Gyakuten Kenji 2. - Added the ability to sign any apk file with a debug key.
- All text documentation is replaced with a single help file in CHM format.
- Added the ability to call the CHM help file with the F1 key.
- Fixed some bugs.
- Some miscelanious changes here and there.
AA Patch Tool v.1.0.1
- Fixed incorrect subtitle for Ace Attorney: Spirit of Justice ROM.
AA Patch Tool v.1.0.0
- Added patch support for Gyakuten Saiban 4/Apollo Justice: Ace Attorney.
- Added patch support for Gyakuten Saiban 5/Ace Attorney: Dual Destinies.
- Added patch support for Gyakuten Saiban 6/Ace Attorney: Spirit of Justice.
- Added patch support for Layton Kyouju vs Gyakuten Saiban/Professor Layton vs. Phoenix Wright.
- Added the ability to change music in Gyakuten Saiban 4/Apollo Justice: Ace Attorney.
- Added the ability to modify pack.dat through repacking.
- Fixed the inability to change music in the Japanese version of Gyakuten Saiban 123.
- Fixed possible Access Violation error that would occur when launching the program.
- Patches: added game title field.
- Patches: added the ability to specify several supported regions for a particular patch.
- Added UI labels that notify which games and regions the current patch supports.
- Improved user language detection at program launch.
- Several change to console message notifications.
- Renamed the tool into 'AA Patch Tool' due to it gaining support for other games in the series.
AAT Patch Tool v.0.7.1
- Now the program will properly work with file paths that contain a space character.
- Changed 'Old MD5' and 'New MD5' console messages to 'Orig MD5' and 'This MD5' respectively.
- Other small fixes.
AAT Patch Tool v.0.7.0
- Initial release.